What are these strange, arcane symbols they call ‘tablature’ (also known as 'guitar tabs' to some)? How can you possibly decipher these in order to learn new music? Do I need a secret handshake or something?
No, not at all. Reading guitar tablature is actually super-easy, and by the end of this brief guide, you’ll be able to read and interpret the basics of guitar tabs efficiently. We’ll describe the main terms, and show you via artfully scrawled diagrams on tab paper what these are likely to resemble in real life.
What are Guitar Tabs?
First of all, let’s determine what guitar tablature actually is. When you look at a sheet of music that contains tablature, you’ll often see a page full of musical notation, with an extra stave of lines and numbers underneath. Good news! You can ignore all of the standard notation: the tab underneath each measure is roughly explaining the same section of music, just in a different way. So, the lines and numbers are what we want to look at. This is the tablature element, and it's pretty simple to get the hang of, once you know a few key tips!
Tablature is used to not only convey particular notes of a given part of music, it’s also used to help describe certain playing techniques involved with that part. These extra little lines and curves that you’ll see are indications of how to actually perform the notes: the guitar is such an expressive instrument that it’s insufficient to merely represent the note itself; we need info on how it’s to behave in order to sound the intended way. We’ll help with this today!
We’d also share that not every publisher (whether in print or online) uses exactly the same conventions for mapping our their tab. Some elements will vary, and, whilst we’ll cover a few variations as we go, you may have to use a little creative thinking when encountering certain transcriptions. We endeavour to have you confident in the basics, at least, so let’s go for it!
Guitar Tab Basics: Lines and Numbers
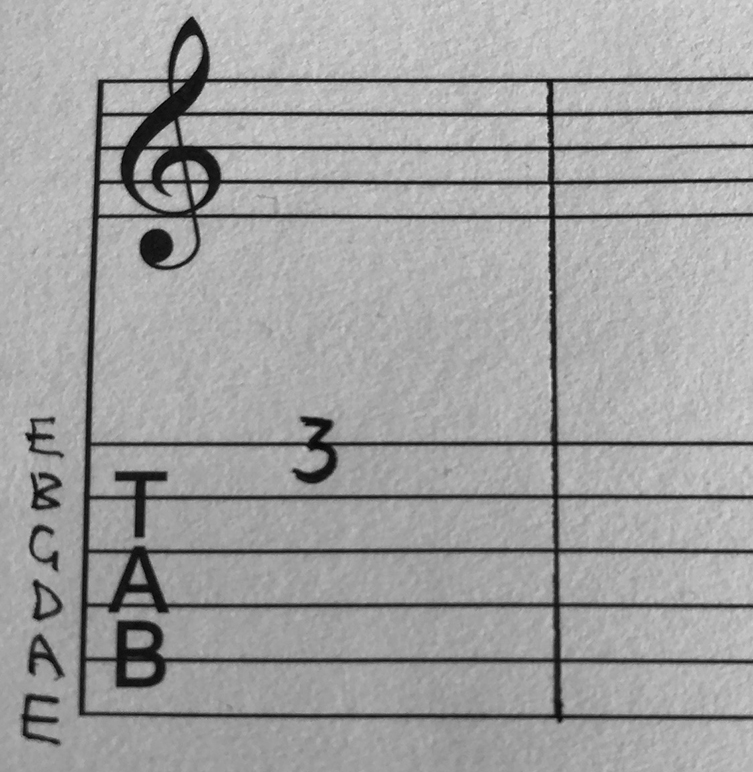
A section of tablature is made up of a number of horizontal lines, each of which represents a string on the guitar. As you’d expect, there are almost always 6 of these, though tab for 7 and 8-string guitar parts will feature the extra strings as additional lines.
We see the lines on the page roughly as we comprehend the guitar itself as we look down on it from a playing position. The first line represents the high E string, and the bottom line represents the low E string.
How Do You Read Guitar Tabs for Beginners?
Guitar tabs are read left to right with vertical lines delineating bar lengths of music as you’d probably expect.
The numbers represent frets. At its heart, that is tablature. You see the number ‘3’ on the top line? That means play the 3rd fret note of the top E string, which is a G.
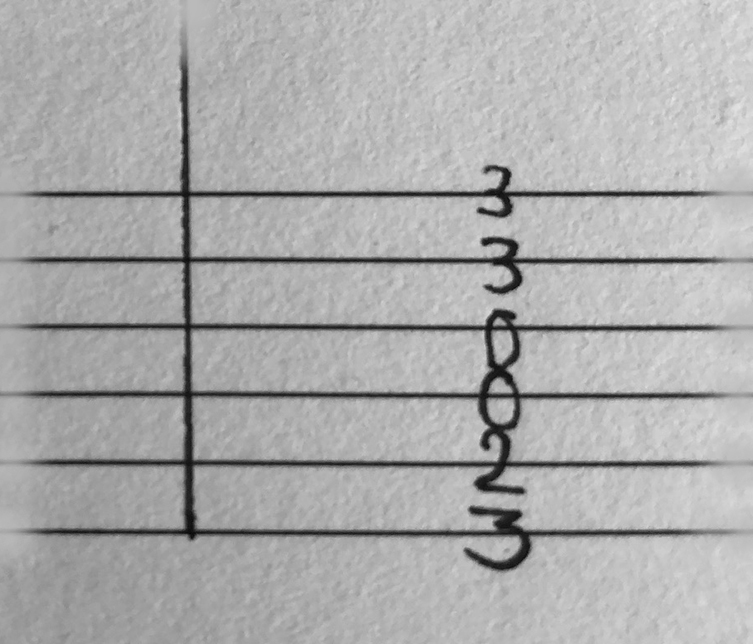
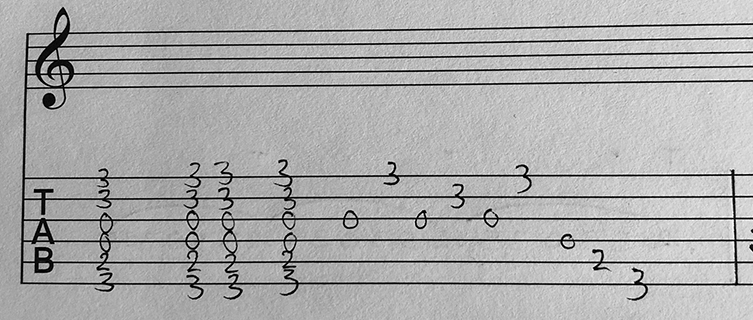
A zero (0) on a string means play the open string. If a number of numbers appear as a vertical line, that means you play a chord. This chord can of course contain fretted notes and open strings. For example, here is how a typical open position ‘G’ chord would look when written as tab:
If the chord appears just as above, then strum the chord normally. If the same lines of numbers (i.e. a chord) appear a number of times, that means you’ve to strum rhythmically in relation to how many times the chord is written. Slight spaces between these lines of numbers indicate gaps in the rhythm, so knowing the song you’re playing will help you to make sense of that. Pages full of numbers like this are usually just strummed chord progressions, so don’t be put off by busy-looking tab sheets! You can most likely perform such a part already!
You may sometimes see a squiggly arrow next to a chord, and it may either be pointing up or down. This just means to ‘rake’ the chord, or strum it slowly so that you hear each note in turn. You’re not picking them out as you’d do for an arpeggio, it’s still a strum, only slower.
Talking of arpeggios, let’s take that G chord and show it as an arpeggio. In this next example, we want to play a linear sort of arpeggio, where we go from the lowest G note (fret 3 on the lowest string) up to the high G on the lightest string. Then, we want to travel back down our arpeggio so we finish where we began, at the low G on the bottom E string. It looks like this:
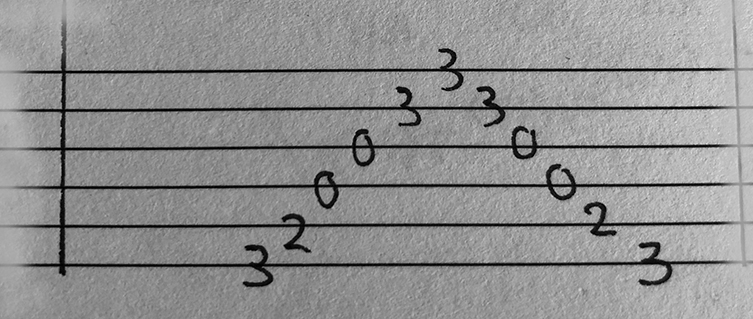
Arpeggios can be played a number of ways, of course, so paying attention to how the notes are arranged will keep you right. This next example shows the same G chord, played as a series of strums followed by a non-linear arpeggio pattern.
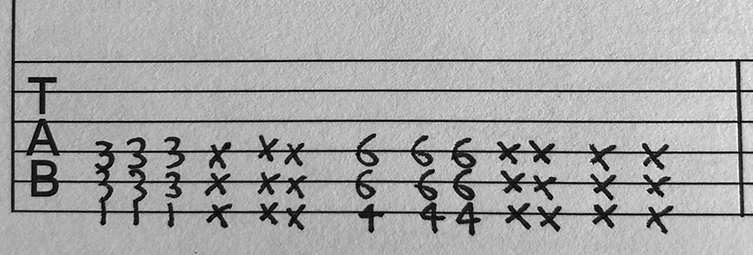
You'll often see ‘x’ symbols on tabs, either on their own, in big groups or even within chords. These mysterious cryptograms are actually just ‘dead’ notes that are played for their percussive quality. You mute them with whichever parts of your left hand are available to do the job, basically. Often, funky wah-wah guitar parts make use of these as if they were blank chord strums, so that the shifting ‘wacka-wacka’ of the wah pedal informs the sound more than any straight-up ‘pitch’. The first example below shows muted chords in between fretted (ie played normally) power chords. Think ‘Nirvana’ here and you’ll understand exactly what we mean! The second example shows a couple of chords played with the thumb of the left hand, which also neatly mutes the A string!
Those are the basics, in terms of placing your fingers on the correct notes in the correct order.
Guitar Tab Symbols Summary
There are several symbols are used within, above and sometimes below the six string lines to help us understand how to play certain parts. Let’s look at them:
H = hammer-on
PO = pull-off
B = bend
/ = slide up
\ = slide down
PM – – – – = palm muting (above or below TAB)
~~~ = vibrato
X = muted hit
Hammering on, Pulling Off, and Trills
Hammering on is when you play any given fretted or open note, then use one of your left hand fingers to strike another note (almost always on the same string) without plucking the string a second time. You use the power of your finger to sound the note. It’s a very normal thing to do, but less normal to explain! Anyway, a hammer-on is normally shown on tabs as an ‘H’ above the hammered note.
A pull-off is the opposite to a hammer-on. You tend to have the second note lined up with (normally) your first finger, but you fret a note higher up on the same string with another finger (often your third or ring finger) and play it first. You then ‘pull’ that finger off (you just lift it) and the second note plays. Sounds confusing, but you’ll do it all the time. Pull-offs usually have ‘PO’ written above them. Sometimes, you’ll get little curved ‘humps’ in between the notes (either hammer ons or pull offs) to indicate that you don’t pick the note: it’s like an extension of the initial pick. This is often used in ‘legato’ passages, where the desired effect is lots of smooth transitions, so you play lots of notes whilst hardly playing any with a pick.
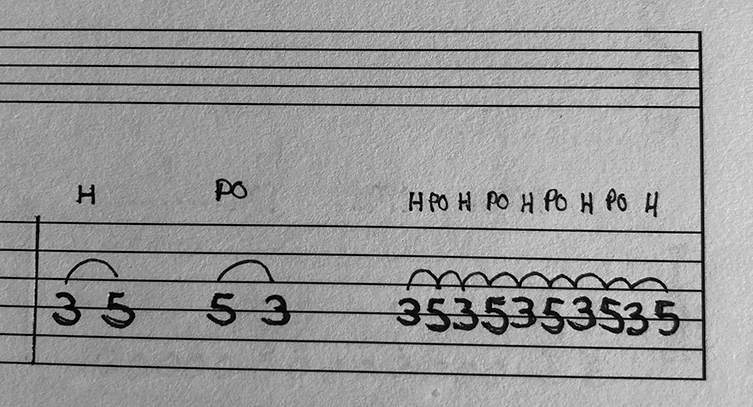
So, if you go back and forth between, say, two notes on the D string, it’ll either look like the example above or a lot of ‘H PO H PO H PO H PO’ written above the corresponding notes. Hammer ons and pull offs can be used in so many ways, but if it is indeed just between two notes, this is often called a ‘trill’, and you’ll have heard this in countless solos.
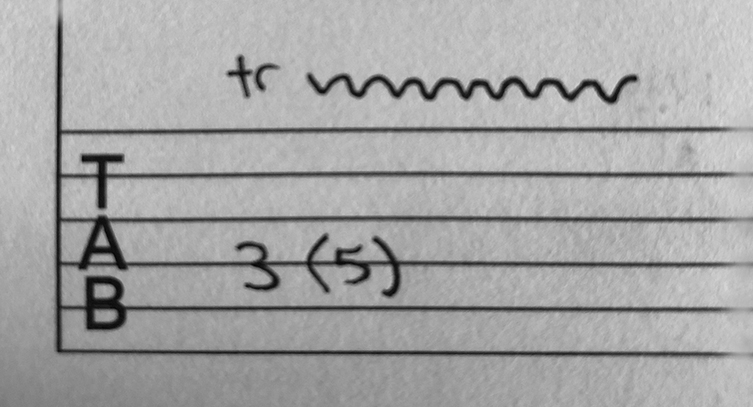
Transcribers often simplify a trill by tabbing the initial note, putting the other note in brackets and using a wavy line above the stave, with the lower case letters ‘tr’ (for trill) in there instead. You may see this in busy shred solos when the notes are perhaps too numerous to fit in otherwise! Trilling is kind of like one-handed tapping in a way, but we’ll look at tapping separately in just a moment.
Slides
Slides are indicated by an elongated oblique horizontal line, normally shaped to comply the direction your fingers should travel, i.e. low on the left and high on the right for a slide ‘up’ the neck, and a downwards sloping left to right line for a slide down the frets. Normally, a starting note and a target note are included at either side of the slide line. Here’s an example of both, with an upwards slide on the left and a downwards slide on the right:
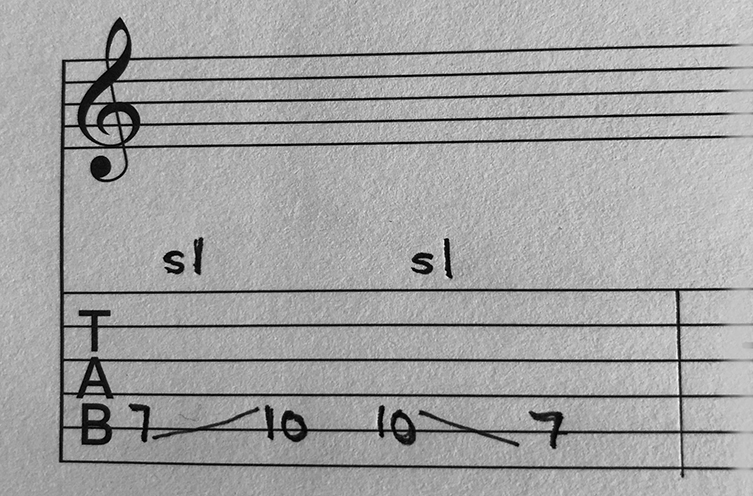
You’ll notice the letters ‘sl’ above the slides on our examples: this is often added, but not always! We’ve included it so you can identify it when you see it.
String Bending
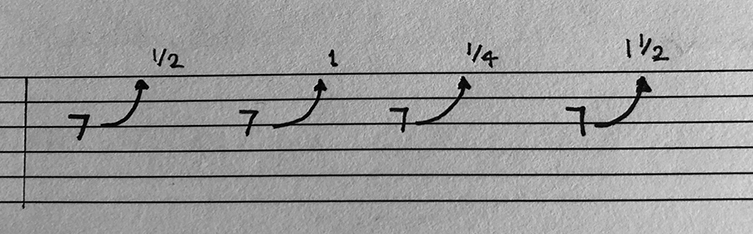
Bending is pretty fundamental to any and all forms of lead guitar playing, so accurate ways to represent them in tab is pretty important. Tabs can sometimes differ on the subject of string bends, though. The most popular way to explain a bend is to have the initial note tabbed as normal, and a curved arrow (generally pointing up since you can only bend down with a whammy bar, which is tabbed accordingly) and an indicator of how much, in interval terms, your bend should travel.
Put more simply, a bend intended to take your note to the next fret will have a ‘½’ value written next to the arrow, and a full tone bend - 2 frets’ worth - will have a ‘1’, since it’s one tone up.
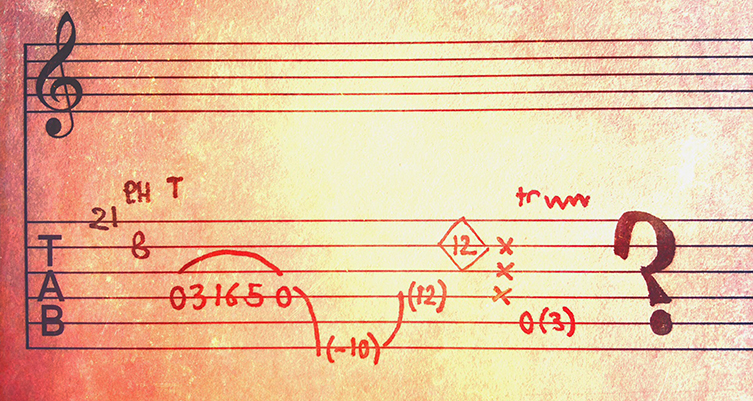
This ‘rule’ applies to other increments too: ¼ tone bluesy bends use ‘¼’, and large David-Gilmour style three fret bends are indicated by ‘1 ½’. Here are all of these examples, in the same order as we’ve described them, carefully scribbled onto plain tab paper:
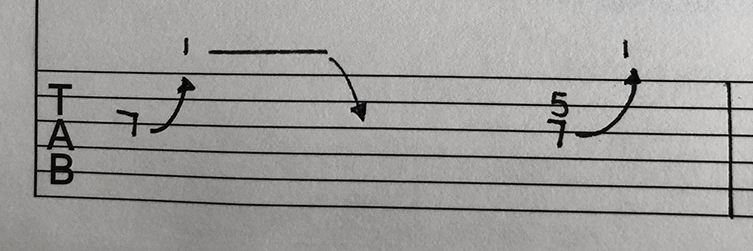
How about a bend and release? Where you bend a note, say, a tones’ worth up, then bring it back down so that the original pitch sounds? Easy enough: the bend is illustrated as before, and then a downwards curve follows on the from initial upwards curve, indicating that you return the pitch to the initial value. If the ‘bent’ note is held for a measurable period of time, that period is written as a horizontal line between the upwards curve and downwards curve. It’s a very wordy way to describe it, but take a look at the diagram below and you’ll see how much visual sense it makes. The curving line basically describes the travel of the note.
Unison Bends
These distinctive ‘shrieking’ sounding bends involve playing two notes on adjacent strings, and bending the pitch of the lower string up until it (usually) meets the same pitch as the one above. Again, as soon as you’ve heard it, you’ll totally know the sound. Anyway, when tabbed, it looks pretty similar to a regular bend, except of course you play two notes at once. A unison bend is picture above, next to the bend and release technique.
Tremolo Dives
Transcribing the activities of a whammy bar into guitar tab can become quite the esoteric business. By its nature, pitches fluctuate wildly, as does timing, given that extreme manipulation of notes can occur very quickly just by pressing the bar down or yanking it up. So, transcribers can often get quite caught up in overly describing the antics of, say, Steve Vai’s more out-there whammy bar excursions, and in such cases we’d suggest putting as much faith in your listening skills as whatever hieroglyphs end up on the page. For example, a track called ‘Tender Surrender’ has, at one point, a wildly squiggly line across the tab staff, with the words ‘whammy bar frenzy’ written in parentheses! Our point is, some sounds are really beyond the scope of tab.
That said, milder tremolo bar use is easy to show. For example, using the bar to dip a note is rendered using two diagonal lines, with a ‘minus’ number (often in brackets) between the lines which tells you the interval to aim for. If you played a ‘D’ note at the 5th fret of the A string, for example, and the number in brackets between the diagonal lines said ‘-2’, then that means you should drop the note by two whole tones, or four frets’ worth. You may also see ‘w/bar’ written above the phrase, too.
If the diagonal line is moving in an uphill direction, then your whammy bar needs to be set to ‘float’, so you can raise the pitch accordingly. Here is the first ‘D’ note example, followed by one where the pitch is raised:
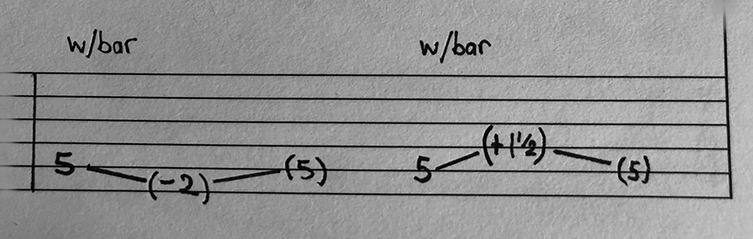
Sometimes, there will be no second diagonal after the first line and interval number. This indicates that the note should end before the bar returns to its neutral position. We’re talking divebombs, basically, where the note drops off and never returns, as it were. Sometimes the tab will actually say ‘divebomb’ or ‘db’ so that it’s obvious. Just deck the note until the string goes slack and then move on!
The language of the whammy bar does go deeper than these examples, but this will get you understanding how it’s described: just follow what’s written next to any particular passage and you should be gold.
Harmonics
Harmonics, as guitarists refer to them, can actually mean a few different things: we have natural harmonics, artificial (or tapped, or ‘harp’) and pinched harmonics, to name but a few. In addition to this, you’ll see these represented in a few different ways (different publishers have different conventions), so we’ll cover the most popular uses here.
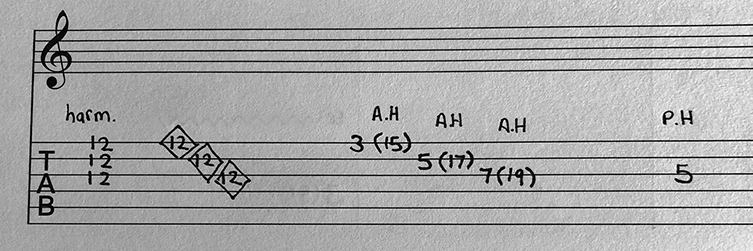
Natural harmonics are the type you play by lightly touching a string at a certain point where there’s a harmonic ‘node’: certain frequencies pop out more as overtones from the strong, which have their own relative pitch (which you can learn). You don’t fully press down on the string, and you don’t hear the fundamental note of the open string, just the harmonic note. You’ll know these from the 5th, 7th and 12th frets across all strings (try it now!) but they occur all over the fingerboard and can sound quite dramatic.
In tablature, you’ll sometimes see the note with a diamond drawn around it, and other times there is text saying ‘harm.’ above them. Simple!
Artificial/tapped/harp harmonics are similar but begin with fully fretted notes, where you touch the string a designated amount of frets above with your right hand fingers in order to summon the harmonic note. In other words, knowing that an open string makes a strong harmonic at the 12th fret, playing a note on the 3rd fret means that a similar harmonic can be achieved by lightly touching the string at the 15th fret, 12 frets above.
For this one, you’ll see the fretted note tabbed normally, then the harmonic note in brackets next to it, often with ‘A.H’ written above it for artificial harmonic, or ‘H.H’ for harp harmonic.
A pinched harmonic is where you make your note ‘squeal’ by touching the string with the thumb of your picking hand at the same time as the plectrum touches the string. You need to experiment a little to find where the harmonic nodes are for the given note you’re trying to squeal, because you can actually get quite a lot of different pitches leaping out depending on where your hands are. The standard notation above the tab will sometimes say which harmonic pitch is desired, but you don’t often get that info on tab. Instead, try different right hand positions when digging in with your thumb, and listen close to the recorded part to match up the pitches. Pinched harmonics generally have ‘P.H’ written above them in tab. Below is a tab stave with examples of these in the same order we described them:
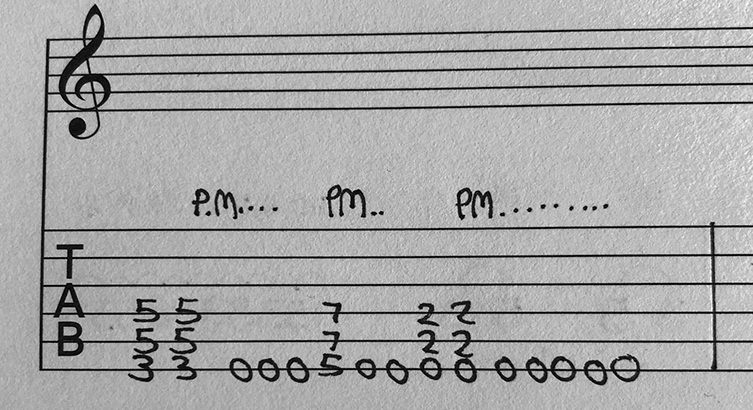
Palm Muting
Palm muting, an essential rock and metal rhythm technique, is where you rest your right hand palm on the bridge, enough to partially mute the strings. Playing the muted strings brings more of a ‘chug’ sound, with little to no sustain. Palm muted guitar parts in tab have ‘PM’ above the first note, followed by a broken line to indicate how long you should continue to palm mute. Here is an example of a few chords playing normally, along with some palm muted notes in between.
Tapping
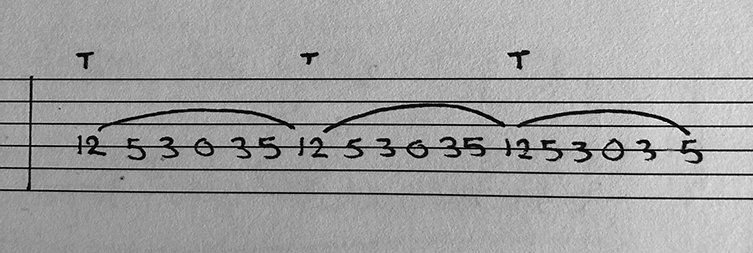
Finally, for today’s article, we’ll look at two handed tapping. Tapping can get quite convoluted, so we’ll keep things simple and talk about two-handed tapping where the right hand uses one finger to reach over and tap in the fingerboard, whilst the left hand is performing the rest of the notes. We looked at trills earlier, and tapping is not a million miles away from that technique, apart from of course the addition of another hand!
Most often, you’ll see long passages of notes with an occasional ‘+’ sign or a letter ‘T’ above particular notes. These are the ones to tap with whichever finger of your right hand you prefer. You’ll also see the curved ‘humps’ from earlier when we explained hammer ons and pull offs, since that’s effectively what’s happening here. The easiest thing is to simply look at this tab below, and understand that anything with a ‘T’ is tapped with your right hand, and everything else is a hammer-on or pull-off with your left.
You're a Tab Master
So, these are the basics. With this info absorbed, you will now be able to look at any piece of guitar tablature and understand what’s happening. You don’t need to be able to read notation, or understand complex time signatures: if you know the song and have followed our guidelines, you are set up to win big. Enjoy!