So, you've been playing the guitar for a while now and have finally decided to take your first step into recording at home. First of all, well done. Taking the leap into something new can be really daunting but once you get some practice in and wrap your head around the basics, you'll be a pro in no time.
Today, we'll be looking at one of our all-time favourite microphones for recording acoustic guitar. We'll also be discussing the best practices of how to record an acoustic guitar at home and our advice on how to mic up your instrument. So whether you'd like to release an album or just share your music with your family and friends, here are some handy tips and pointers on how to capture your sweet acoustic tunes with ease.
With many ways to achieve professional-quality recordings at home with a modest amount of gear, it's never been a better time to dip your toe into the recording waters. We've recently teamed up with audio giants, Shure, to bring you our Shure Sessions series and have enjoyed using the Shure Beta 27 as the main acoustic mic.
What's the best mic for recording acoustic guitar?
While your music may feature other instruments or vocals, naturally, as guitarists, we want the guitars to sound great! Enter the Shure Beta 27...
The Shure Beta 27 is an extremely versatile microphone, which is one of the main reasons why we love it so much. It is a super-cardioid large-diaphragm microphone and can be used to mic up electric and wind instruments, as well as bass amps, drums and percussion, so it's a fantastic piece of kit to have in your arsenal. For us, we love using the Beta 27 to capture acoustic sounds. Whether that's full-blown strumming or soft fingerpicking, it all sounds superb through the Beta 27. In fact, we love it so much, we've used it as the main acoustic mic in our Shure Sessions series!
.00_17_53_11.jpg)
For being a large-diaphragm mic, the Beta 27 is relatively small and compact which makes it nice and easy to place in front of the sound source. We're not going to get too technical here in this blog, but inside it has a 3-position switchable low-frequency filter that helps reduce unwanted background noise, meaning that it is great for recording at home! There's always someone who decides to start mowing the lawn as soon as you're super vibed up and ready to hit record, isn't there?
One thing that stands out for us with the Shure Beta 27 is how it captures a very natural sound and when listening back to your recording it almost feels like you’re in the room experiencing a live recording. Its outstanding clarity and smoothness make it a great choice for home studio or professional use.
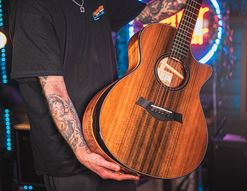
The Shure Beta 27 In Action
We're such big fans of this microphone, that we've used it to capture acoustic guitar sounds during the filming of our Shure Sessions series. Just check out our video below with Glaswegian singer-songwriter Murdo Mitchell to hear the Beta 27 in all its glory. We think you'll agree, it sounds fantastic!
Let's Talk About Mic Placement
Whether you've got access to an entry-level microphone or something a little more high end, where you actually place the mic in relation to the sound source is arguably the most important element when it comes to recording. Getting this right during the recording process will help you in the long run, especially when you enter the mixing stage. You've got to find the money spot and that all depends on what kind of sound you're after and what type of room you're recording in, so it's always worth experimenting first and trying out different mic placements.
-3-(1).jpg)
A good starting point is to aim the mic at the point where the neck and body of the guitar meet, right around the 12th fret. If you're recording in a room with ideal acoustics, we recommend placing the mic around 12 to 16 inches away from the 12th fret. However, if you're working in a less-than-perfect room, try playing the mic 12 inches or less from your instrument. Placing the mic too close to the guitar can lead to a variety of issues, such as capturing too much fret noise, so again, it's probably a good idea to play around with this. If you're looking to add a little more bass to your sound, try aiming the mic a little higher over the guitar's low-end strings.
Top tip - We wouldn't recommend placing the microphone directly in front of the soundhole, as that will literally act like a big black hole and soak up all your sweet acoustic sounds. You'll most likely end up with a 'boomy' sounding guitar which won't sound great and will be difficult to mix when you're further down the line.
Final Thoughts
One of the most exciting things about playing an instrument is writing and recording your own music. The feeling of making what’s in your head a reality is one of the most rewarding aspects of your musical journey. Capturing your ideas and turning them into recordings shouldn't feel daunting - it should be an enjoyable experience and a fun milestone in your guitar playing career.
Speaking from the experience of filming and recording our Shure Sessions series, it's always a good idea to explore different mic options and positioning. Once you've found a mic you're happy with experiment and try out different mic placements to see what sound you like. When you've found the sweet spot, you'll be able to go forth and enjoy the recording process. As always, if you want to try out a couple of mics or learn more about different mics for your recording needs, just pop by one of our stores and we'll help you out!
Catch Up With Our Shure Sessions Series